Moving to a new house can be stressful. To make it less stressful, it’s essential to ensure your stuff gets to your new home safely. Plates and dishes are fragile, so it’s crucial to be careful when packing them. Here’s a simple guide on how to pack dishes step by step. Keep reading this, and you will get to know how to pack glasses and plates whenever you are moving out!
Table of Contents
ToggleGet Medium Heavy Duty Packing Boxes
Dishes and plates can get heavy when you pack them, and the boxes may become too heavy to lift if they’re large. It’s better to use medium-sized boxes so they’re not too awkward or heavy to pick up when complete.
To keep your fragile dishes safe, use double-walled solid boxes. These can handle the weight and protect your dishes from any bumps during the move.
Bubble Wrap For The Inside Of Your Boxes
For added protection of your dishes, follow these detailed steps when using bubble wrap inside the packing boxes:
Prepare the Box: Choose a sturdy packing box appropriate for your pottery’s size and weight. Ensure the box is clean and free of any debris.
Get Bubble Wrap: Obtain enough bubble wrap to cover the entire bottom of the box and line the internal walls.
Cover the Bottom: Unroll a section of bubble wrap and place it at the bottom of the box. Make sure the entire bottom surface is covered with a layer of bubble wrap.
Wrap Individual Items: Take each dish or crockery item and wrap it individually with bubble wrap. Ensure that fragile parts are well-protected and corners are covered.
Arrange in the Box: Place the individually wrapped dishes into the box, arranging them to minimize empty spaces. Nestle the items closely together to prevent shifting during the move.
Fill Gaps and Line Walls: Scrunch up additional bubble wrap or use bubble wrap sheets to fill any gaps between the dishes and along the internal walls of the box. The goal is to create a cushioning effect that adds an extra layer of protection.
Secure Placement: Press down on the dishes to ensure they are snug and well-secured within the bubble wrap cushioning.
Close the Box: Once the box is filled and the dishes are securely packed, close the box’s flaps.
Secure with Tape: Seal the box with packing tape, ensuring all seams are well-covered to maintain the box’s integrity.
By diligently following these steps, you create a well-protected environment for your dishes within the packing box, minimizing the risk of damage during the moving process.
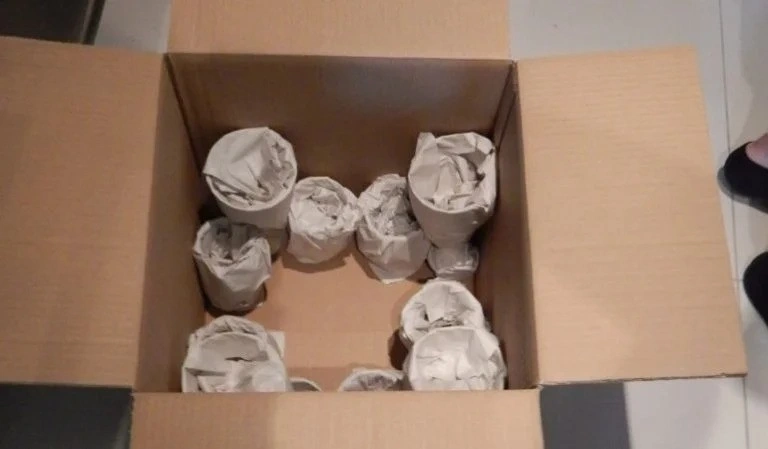
Wrap Each Plate In Tissue Paper
Take each plate and wrap it up separately using acid-free tissue paper. This type of paper is great because it prevents moisture from causing damage like tarnishing or discoloration to your crockery. Avoid using newspaper, as the ink could rub off and stain your dishes.
Packing The Plates Into The Boxes On Their Side
Place the plates into the boxes on their sides, not flat, and stacked on each other. Packing them sideways helps absorb shock and stress, reducing the risk of damage. It’s a good idea to put a sheet of bubble wrap between each plate for added protection.
Filling The Gaps In The Box
After you’ve packed the box with your dishes, a helpful tip is to crumple up any extra tissue paper and use it to fill in the gaps at the corners and sides of the box. This keeps the plates from shifting during the move. Before sealing the box, add a layer of bubble wrap on top of the plates for an extra layer of protection.
Sealing The Box Properly
To ensure the box is securely sealed, follow these steps:
Inspect the Box: Check the box for potential weaknesses or damages before sealing. Ensure it’s in good condition and can withstand the weight of its contents.
Organize the Contents: Arrange the packed dishes evenly within the box, ensuring no protruding edges or uneven distribution of weight.
Use Packing Tape: Employ high-quality packing tape to seal the box. Start by taping along the bottom seam, ensuring the edges meet securely. Use enough tape to create a sturdy bond.
Double Sealing: Add a tape strip along the bottom seam for security. This extra layer can reinforce the box and prevent it from opening during transit.
Secure the Edges: Run the tape along the edges of the box, where the flaps meet. This helps to strengthen the sides and adds stability to the overall structure.
Cross Taping: To further enhance the seal, tape across the top of the box in both directions, forming a cross. This method provides extra support and helps keep the flaps in place.
Check for Gaps: Run your hands along the box’s edges and corners after sealing to ensure no gaps or loose areas. Press down on the tape to secure it firmly.
Label the Box: Once sealed, don’t forget to label the box with its contents and destination room. This makes it more accessible during the unpacking process.
By following these detailed steps, you can ensure that your box is securely sealed, minimizing the risk of damage to your valuable crockery and dishes during the moving process.
Labeling The Boxes
Wrap the entire box with fragile packing tape so that the folks helping with the move (or anyone carrying the boxes) are aware of handling them with extra care. Take a marker pen and label the outside of the box with what’s inside and which room it should go to in your new place. This way, there’s less chance of mix-ups when it’s time to unpack.
Final Thoughts:
Protect your dishes during a move with these steps: Choose medium heavy-duty boxes, use double-walled boxes for protection, wrap plates in acid-free tissue paper, pack plates on their sides with bubble wrap in between, fill gaps with crumpled tissue paper, seal boxes with double layers of tape, and label clearly for an organized unpacking.